How to Test a Car Battery? Have you faced this type of problem in your journey? Car batteries or automotive batteries are rechargeable batteries used to power motor vehicles. By providing an electric current, it starts the chemically-powered internal combustion engine that actually propels the vehicle by electrically starting the electric-powered starting motor. It is part of the car’s starting system where the battery is located. Let’s start!
How to Test a Car Battery? Basic Concept
Batteries in cars eventually stop working, and diagnosing the problem accurately is crucial. There is no doubt that car batteries are essential for the operation of the vehicle, but, like everything else, they will eventually fail as well.
The most common sign that your vehicle has been damaged by this is that it would not start or the engine turns over weakly. It is important to determine whether your battery is drained and needs to be recharged, or if it is too weak to hold a charge, before starting your vehicle when your battery runs down and you cannot start it.
There are times when low or dead batteries simply need to be charged or boosted in order to function. The batteries need to be replaced when they lose their ability to hold a charge after a certain period of time.
Other factors for Testing of a Car Battery
In order to determine the problem with your battery, it is important to perform a proper battery testing procedure. With a dedicated battery tester, you can easily test the health of your car’s battery in a detailed manner. A multimeter could be used, but you would not get the same amount of information about what is going on inside the battery as you would with a multimeter.
For the testing of a car battery you might require the following tools:
- Car battery tester
- Voltmeter or a Multimeter
What is the Process to Test a Car Battery
01. Put the battery in the garage for a couple of days, then avoid driving
- Before you test your car battery, wait at least a few days without driving it unless you have already determined that it would not start and suspect there may be a problem with the battery.
- While your vehicle is running, the alternator of your vehicle charges the battery to keep the battery charged. In order to know how well your battery is holding a charge, you should test it after not driving your car for a few days. You will probably need to replace it if it runs down significantly over a period of time.
- In order to test your vehicle’s battery, you will need to lift the hood, and then when you are ready if that is where the battery is located. You may find it elsewhere in the vehicle if it is not in the glove compartment.
02. Test the battery by connecting the battery tester
- The positive terminal of your battery has a red plastic protective cover that needs to be removed.
- It is important to connect the red cable clip of your battery tester to the positive terminal of the battery
- Make sure that the black cable clip is connected to the negative terminal of the tester, and then turn it on.
- During the cranking tests that will be performed with the vehicle running, you will want to position the tester in such a way that it sits flat and would not fall down into the engine later when the cranking tests are performed. There is no need to worry about electrocution when it comes to car batteries, as their voltage is not enough to electrocute you.


- 170 CCA; Better warranty: Limited 2-year full replacement warranty, not pro rata; Longer service life: With 3-10 years of service life, ODYSSEY batteries save consumers time, money, and aggravation
- Longer cycle life: 70 percentage longer cycle life compared to conventional deep cycle batteries, up to 400 cycles at 80 percentage depth of discharge- high stable voltage for longer periods of time
- Faster recharge: The highest recharge efficiency of any sealed lead battery on the market, capable of 100 percentage recharge in 4 - 6 hours; Mounting flexibility: Non-spillable design
- Vibration resistance- design protects against high impact shock and mechanical vibration; Extreme temperature tolerant
- This item is not for sale in Catalina Island
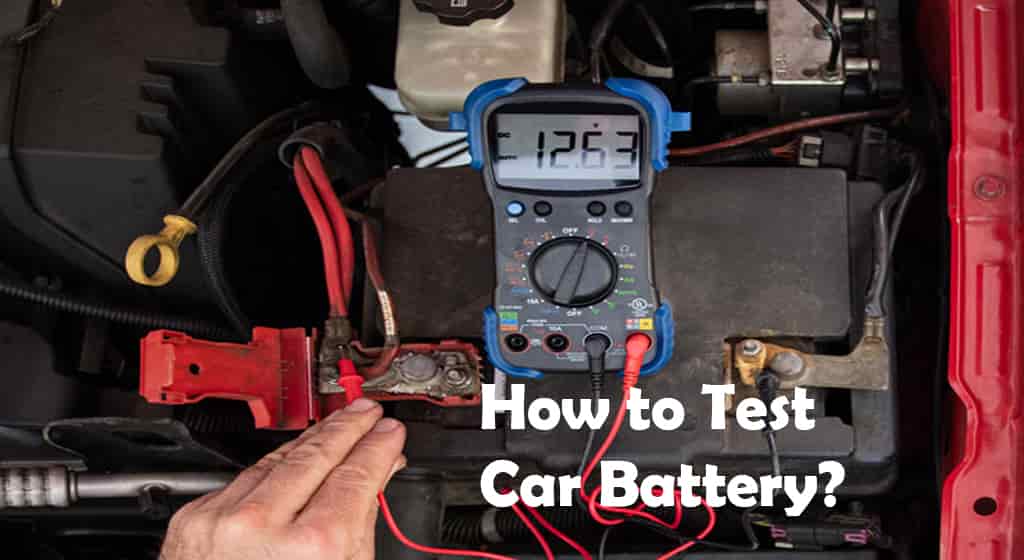
03. Test out the voltage
- In order to determine the battery’s state of charge, you should switch your battery tester to the voltage testing mode.
- The majority of car batteries are labeled as ’12-volt’, but the actual voltage varies depending on how the charge is maintained. An easy way to determine the condition of a battery is with a voltmeter or multimeter, but a battery tester will also be able to perform this test.
- Make sure that the battery voltage is within the normal range for a healthy battery.
- When the battery is fully charged, it should read at least 12.6 volts. In spite of the fact that it will still start your car even with a voltage of 12.4, it is only about 75 percent charged. When the battery is reading 12.0 volts or less, this is a warning sign that the battery is unlikely to be able to hold a charge for very long.
04. Testing the cold Cranking Amps
- The battery tester you are using should be set up to work in the CCA mode (cold cranking amps).
- An average battery’s cold cranking amps is a term used to express how much electricity is flowing from the battery at a temperature of 0 degrees Fahrenheit. It is likely that the CCA rating of your battery can be found in the casing of the battery.
- You will need to enter the CCA rating number of your battery into your tester.
- To determine the actual CCA performance of your vehicle, it is often necessary to start the vehicle while the tester is connected.
- Use your battery tester to compare the CCA rating of your battery with the actual CCA rating of your battery.
- In order for a battery to be considered healthy, it must deliver close to its maximum CCA rating. In the case of a failing battery, this would not be the case. By measuring the amount of CCA produced by the battery, the tester is able to determine the battery’s health status.
05. Carrying out the cranking test
- It is important that you set your battery tester to cranking test mode before you start your vehicle. As the starter motor is running, the battery’s voltage will fall to its lowest possible level in order for the tester to record that low voltage.
- You should take note of your battery’s cranking reading when you start it up.
- In order for a battery to remain healthy, the voltage should remain between nine and ten volts while cranking. You may need to replace your battery if the test results indicate that your battery has less than nine volts.
06. Carrying out the charge test
- When the car is running, switch your battery tester to charging testing mode so that it can test the battery.
- Your voltage reading should be between 14.2 and 14.5 volts when you have a good battery and alternator. It is possible that your alternator, or other parts of the charging system, might need to be repaired if it is less than this value. An AC volt meter or a multimeter can also be used to perform this charging test as a backup method
Testing the Battery of a Car with a Multimeter
In the field of electronic measurement, a multimeter is one of the most widely used devices, which allows you to measure voltage, amps, and resistance in electrical sources. An automotive multimeter is most commonly used in order to test the strength of a car battery, which is the most common application for the device.
As long as the unit is used correctly, it can provide voltage information to a high degree of accuracy on a digital readout, depending on the voltage level. When determining whether a battery is strong and healthy or if it needs to be replaced, it is crucial to understand the data provided by the device. Let’s see the steps for testing the Battery of a Car with a Multimeter:
01. Make sure the battery is prepared
The first step in this process is to locate the vehicle battery’s positive and negative terminals and determine whether there is any dirt or corrosion present at the terminals. In order to do this, you should consult the owner’s manual. Positive terminals are usually surrounded by a red cover and are often marked with a plus sign.
Negative terminals are usually marked with a minus sign and are usually covered in black. The multimeter should be scrubbed down with fine-grit sandpaper in order to remove corrosive buildup, as corrosive buildup can prevent the multimeter from taking accurate voltage readings. In order to prevent skin exposure to harmful chemicals and acidic battery fluid, gloves should be worn when handling these substances. As soon as the terminals have been cleaned, they will be used for attaching the probes to the multimeter once they have been cleaned.
02. Setting the Multimeter
There are many measurement settings on the multimeter, which may make it appear complicated at first glance, but its general operation is fairly straightforward. A multimeter dial should be turned to the “20 volts” setting if you wish to test the electrical output of a vehicle battery by using a multimeter.
Nonetheless, in order for an accurate reading to be obtained from the multimeter, all surface charges from the battery must first be removed before the multimeter can be used. It is recommended that the headlights are turned on for about two minutes, then they should be turned off in order to accomplish this.
03. Measuring and Analyzing
The process for measuring and analyzing are as follows
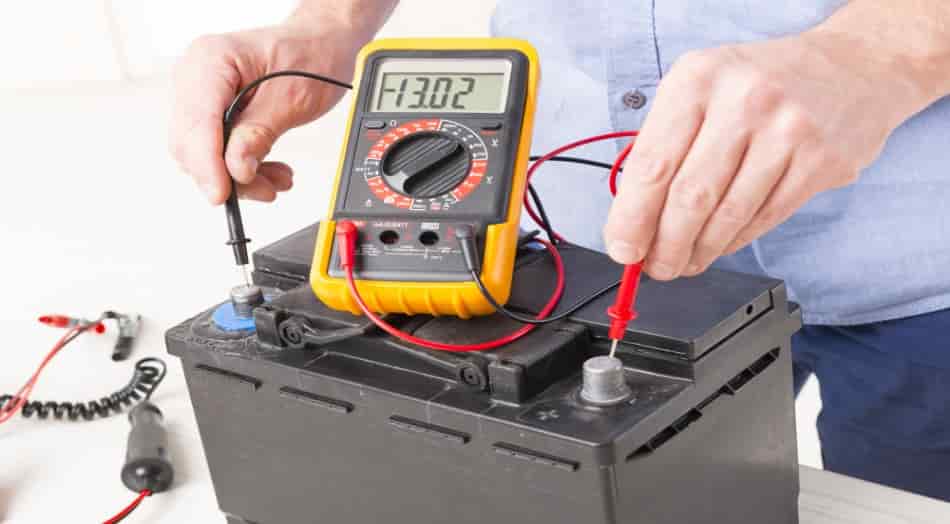
- The multimeter is equipped with two probes in order to measure the battery load: red and black. In terms of positive terminal contact, the red probe is used for this purpose, while the black probe is used for negative terminal contact.
- In order to determine whether the battery is fully charged, you should look at the display of the multimeter when the probes are touching the terminals while the car is off and the battery is resting or full charge. As long as the battery voltage is within this range, the battery is in good condition to start the vehicle. The battery’s resting voltage is less than 12.2 volts, which is a sign that the battery has a weak resting voltage. This means that it may need to be charged or replaced if the measured reading is less than 12.2 volts.
- The next step after determining the resting voltage will be to take a reading of the crank cycle in order to determine the cranking voltage. It is at this point when the vehicle is turned on and the battery is at its highest draw because the higher amount of energy that is required to drive the starter motor is what is putting the most strain on the battery.
- There will be a need for a second person in order to start the ignition in order to get this reading, so a second person will be required. In the immediate aftermath of turning the ignition on, the voltage reading should fall for a brief moment, but it should not drop below 10 volts for a long period of time. It is obvious if this value falls below 10 volts that the battery has insufficient turnover strength and is therefore prone to failure if the voltage drops below 10 volts. It is possible that recharging or replacing the battery is required in this particular case.
- The vehicle will begin to idle immediately following the crank cycle and will maintain a steady draw from the battery for a short period of time. As long as the motor is running, the multimeter’s rating should remain between 14 and 14.5 volts while the motor is running.
- When the battery voltage drops below 14, it can either be a sign of a weak battery that is unreliable for sustained vehicle operation, or it can be a sign that the alternator is failing. While a vehicle is running, the alternator’s job is to generate energy for the electrical system and the battery so the electrical system can function and the battery can be charged.
04. Testing the Alternator
When it comes to testing the alternator, make sure that virtually all of the vehicle’s electrical equipment is turned on – the headlights, interior illumination, climate controls, and stereo. By doing this, you will be able to maximize the voltage load. There is a possibility that the alternator may need to be replaced if the multimeter reading drops below 13.5 volts, which means the alternator may be struggling to charge the battery properly. In order to get a second opinion on your case, you should consult a licensed professional.
In order for a car owner to be able to provide a valuable amount of information regarding the battery and electrical system of a car, it is crucial that he or she use a multimeter in order to collect valuable information. By performing periodic testing, we can be able to predict and prevent imminent failures, which are often unwelcome surprises when they occur.
What do you need to know about how to test a car battery at home without using any tools?
01. Performing a Load test
If you are not a mechanic, it can sound intimidating to perform any “test” on your car. The good news is that this one is fairly straightforward to understand.
- Make sure that your headlights are on without starting your engine.
- It is recommended that you leave them in the “ON” position for 10 – 15 minutes.
- Start your car as soon as the time has passed.
- Make sure your headlights are shining brightly at all times
There is a possibility that your battery does not pass the load test if your headlights dim noticeably as your engine turns over. It is important to make sure that the battery holds enough charge so that it can handle the 10 -15 minutes before the engine starts, as well as once the engine starts. There is a high probability that if your car’s battery is not working correctly here, it will need to be replaced before it fails you on the road.
02. Checking for Corrosion
The corrosion on the battery of your car, aside from looking like something that would ooze out of an evil scientist’s lab, could also be a sign that something is wrong with the power.
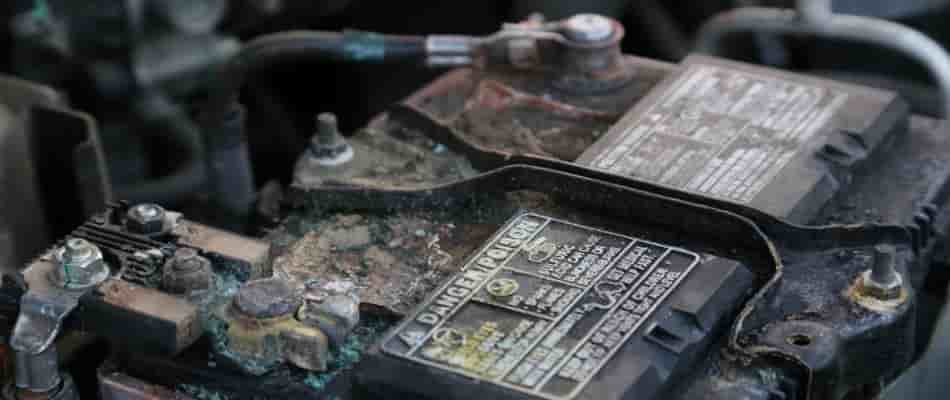
In the course of time, corrosion, caused by the hydrogen gas released by the acid within the battery, may interfere with the battery terminals’ ability to transfer power as a result of the corrosion. In order to compensate for this, the battery has to work harder, and as a result, its life can be shortened.
There are several household items that you can use to clean the battery terminals, such as baking soda and an old toothbrush. However, if you have been suffering from corrosion for a long period of time, you may have irreversible damage to your battery. That is why it would be a good idea to replace your car battery in such a case.
03. Pay attention to the clicks.
In the ignition, if you turn the key over, you should hear a lively roar that settles into a purr after a few seconds. If you hear a clicking sound instead of the normal sound, then your car battery is probably dead. It is possible for a single click, on the other hand, to indicate that there is a problem with the starter.
Those clicks may not indicate that you need a new battery, but they are a good indicator that you should replace your battery. Regardless of whether a jump start is able to get the vehicle started, the first place you should turn to is a shop with an experienced, trusted technician
04. Using a virtual battery tester
Although the results are not fully accurate but still the performance of a virtual battery tester is something to be amazed about. The things you must keep in mind are
- Download the virtual battery tester to your device
- Your zip code, the year and make of the car, as well as the model and engine type, should be entered.
- Then you have to click on the Find out now button present in the application
You can find out the expected lifespan of a battery using the virtual battery tester. There are several factors that can influence the life expectancy of your battery, such as corrosion or weather, and this can influence the accuracy of the test.
How Can You Replace a Dead Car Battery?
In spite of the fact that a car battery could always be replaced in an auto shop, it is something you can easily replace yourself at home if the battery goes dead. There are a few things that you should keep in mind if you decide to take the DIY route instead of hiring a professional to do it for you.
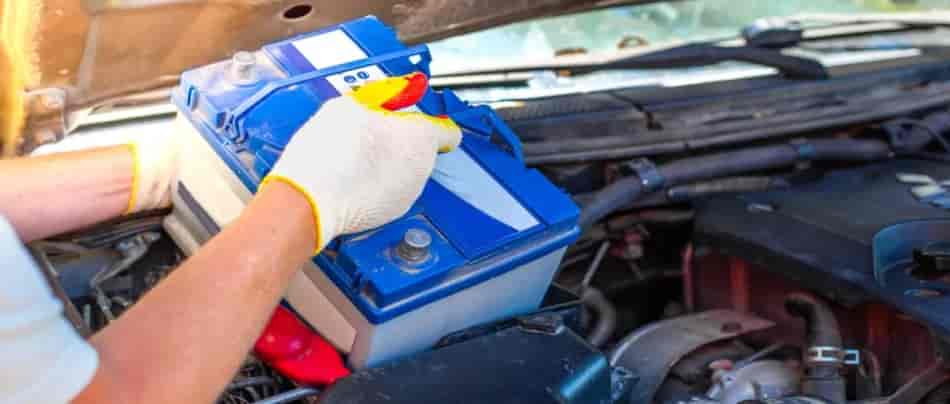
- The first step is to make sure all safety precautions that may be listed in the owner’s manual are followed.
- I would also recommend wearing gloves and eye protection when working with battery acid, as it can have quite a damaging effect on the skin.
- The third thing you should always do is disconnect the negative terminal of your battery before the positive terminal.
- You will never touch the terminals or posts of the battery with a metal tool.
- Last but not least, please be aware that sparks can occur both from the battery and around the battery.
Frequently Asked Questions
How Often Should You Replace Your Vehicle’s Battery?
In the event that a mechanical issue is causing your battery to run less efficiently, you may be able to extend its life simply by fixing that issue. Battery corrosion can be removed by your auto technician, bad cables and alternator parts can be replaced, and circuitry problems that drain your battery can be found.
There comes a time when all car batteries reach their end of life. When your battery is no longer capable of supplying power to your car, watch for specific warning signs. A starter solenoid that does not receive enough power can cause dim or flickering headlights, difficulty starting or a refusal to start, and a clicking sound.
What are some tips for preventing car battery problems?
There are some simple preventative measures that can be taken to make sure your car battery lasts as long as it should. The first thing you should do is schedule regular maintenance inspections which should include checking the voltage of the battery. The battery may appear to be fine, but your technician may observe abnormal electrical activity that might cause the battery to drain more quickly.
You can also avoid the untimely death of your battery by driving with smart driving habits. Once you have finished driving, make sure all lights and other electrical devices have been turned off. Make sure all chargers and devices connected to the computer are unplugged. Avoid unnecessary short trips & extreme temperatures when planning your drives.