An air conditioner (AC) is a vital appliance for maintaining a comfortable indoor environment during hot weather. However, when an AC fails to cool a room below 75 degrees Fahrenheit (24 degrees Celsius), it can lead to discomfort and frustration. In this brief guide, we will explore some common reasons behind this issue and possible solutions.
When your AC struggles to cool below 75 degrees Fahrenheit, it might be due to issues like thermostat settings or dirty filters. You can try adjusting settings and cleaning filters yourself. For more complex problems like refrigerant leaks or a malfunctioning compressor, consult a professional HVAC technician to ensure your AC works efficiently. Simple maintenance might resolve the issue, keeping you comfortable indoors.
AC Not Cooling Below 75 Degrees F Basics
Before getting into the topic, let us see the brief working philosophy. The operation of an AC is rooted in a simple yet efficient principle. It relies on a refrigerant, a special fluid, to absorb heat from the indoor air. This heat-absorbing refrigerant is then circulated outside, where it releases the absorbed heat. This continuous cycle of evaporation, compression, condensation, and expansion allows the AC to consistently cool and refresh the air within your home, ensuring a soothing and comfortable atmosphere even on the hottest days.
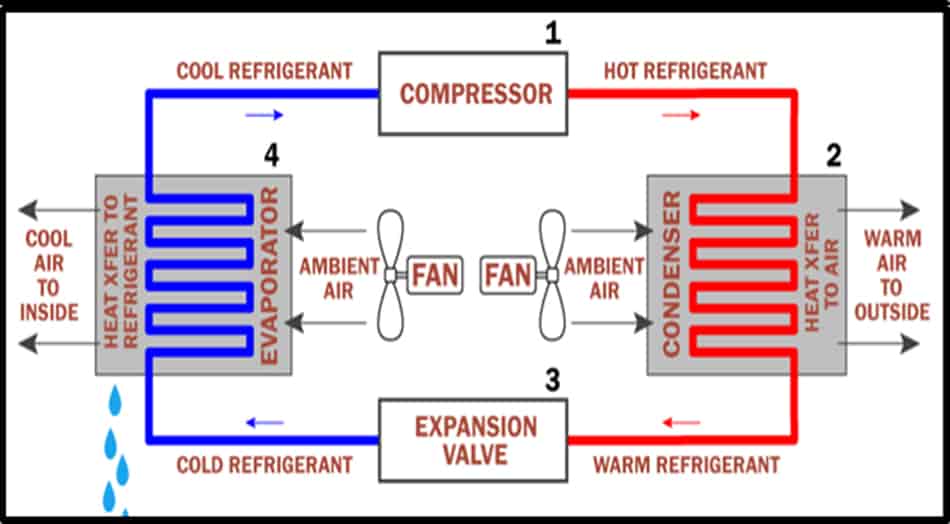
Before understanding the concept for AC Not Cooling Below 75 Degrees F, let us try to understand the operation. The operation of an air conditioner (AC) involves several steps that work together to cool indoor air. Here is a step-by-step working principle of how an AC functions:
1. Air Intake: The process begins when warm air from your indoor space is drawn into the AC unit through the return air grille.
2. Filtration: Before the air reaches the cooling components, it passes through air filters. These filters are designed to remove dust, debris, allergens, and other particles from the air, ensuring that the cooled air is clean and healthy.
3. Cooling Process: The warm air then enters the evaporator coil, which is located inside the indoor unit of the AC. The evaporator coil contains a refrigerant, typically a chemical compound like R-410A or R-134a or R-407c or R-502a. This refrigerant is in a low-pressure, gaseous state at this point. As the warm air passes over the evaporator coil, the refrigerant inside the coil absorbs heat from the air. This heat exchange causes the air to cool down significantly, creating a cooler indoor environment.
4. Compressor Action: The compressor, often referred to as the “heart” of the AC, plays a crucial role.
- It is located in the outdoor unit of the AC system.
- The compressor’s function is to pressurize the refrigerant, transforming it into a high-pressure, high-temperature gas.
5. Heat Discharge: The hot, high-pressure gas created by the compressor is then transported to the condenser coil, which is also located in the outdoor unit.
- In the condenser coil, the hot gas releases the heat it absorbed from the indoor air.
- As a result, the refrigerant undergoes a phase change and condenses into a liquid.
- This process effectively expels the heat collected from your indoor space.
6. Expansion Valve: After condensation, the refrigerant, now in liquid form, flows back to the indoor unit.
- It passes through an expansion valve, which rapidly reduces its pressure.
- This sudden pressure drop causes the refrigerant to expand and evaporate, turning it back into a low-pressure gas.
7. Cooling Cycle Continues: The low-pressure gas returns to the evaporator coil, and the entire cycle repeats. Warm air is continually drawn in, cooled by the evaporator coil, and then circulated back into your indoor space.
This continuous cycle of evaporation, compression, condensation, and expansion allows your AC to extract heat from indoor air, maintaining a cool and comfortable temperature indoors. By efficiently removing heat and providing cooled air, the air conditioner keeps your living space pleasant, even on the hottest days.
Air Conditioner or AC not cooling below 75 degrees F
The Ideal Indoor Temperature: While 75 degrees Fahrenheit is often considered a comfortable indoor temperature, it’s essential to remember that personal preferences vary. Some people prefer a cooler setting, while others may be content with a slightly higher temperature. The key is finding the temperature that suits you and your household members.
However, if your AC is not even able to reach 75 degrees Fahrenheit, there may be underlying issues that need to be addressed.
Common Reasons Your AC Is not Cooling Below 75 Degrees F
01. Incorrect Thermostat Settings
A thermostat controls your air conditioning system. Incorrect settings can hinder your AC’s cooling performance.
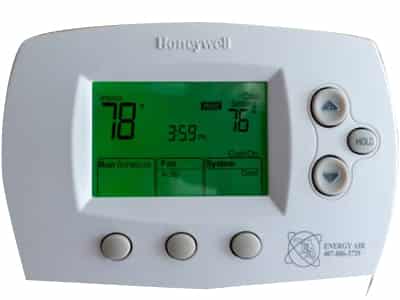
- Cool Mode: Ensure that your thermostat is set to “cool” mode, as selecting “fan” or “heat” will prevent the AC from cooling the air.
- Temperature Setting: Verify that the temperature setting is lower than the current room temperature. If the setting is higher than the room temperature, your AC would not engage in the cooling process.
02. Dirty or Clogged Filters
Air filters are vital components of your AC system. They filter out airborne particles, ensuring the air you breathe is clean. Over time, these filters can become clogged with dust, debris, and allergens, which can impede airflow and reduce cooling efficiency.

- Visual Inspection: Check your air filter by removing the filter cover. If it appears dirty or clogged, it is time for maintenance.
- Cleaning or Replacement: Depending on the type of filter your AC uses, you can either clean it (if it is reusable) or replace it with a new one. Cleaning or replacing your filters every 1-3 months can significantly improve cooling efficiency.
03. Low levels of refrigerant
The refrigerant in your air conditioning system is its lifeblood. There is an absorption and release of heat by it. When refrigerant levels are low, your AC’s ability to cool air is compromised.
- Signs of Low Refrigerant: Watch for indications such as reduced cooling performance, ice buildup on the evaporator coils, hissing or bubbling noises from the refrigerant lines, and higher energy bills.
04. Air Duct Issues
The air ducts in your home are responsible for distributing the cooled air from your AC throughout your living spaces. If these ducts are obstructed or leaking, it can significantly affect cooling efficiency.
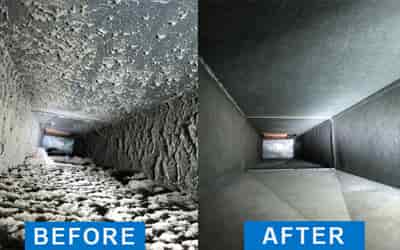
- Blocked Ducts: Check for any obstructions in your ductwork, such as furniture or debris. Clearing these blockages can help ensure proper airflow.
- Leaky Ducts: Leaks in your ductwork can waste cooled air, causing your AC to work harder without effectively cooling your space. While you can seal visible leaks with duct tape, comprehensive duct sealing may require professional assistance.
05. Problems with the Compressor
The compressor is a critical component of your AC system. It’s responsible for pressurizing the refrigerant, facilitating the heat exchange process, and maintaining consistent cooling.
- Signs of Compressor Issues: Keep an ear out for unusual noises like clanking or banging when your AC is running. Additionally, if your AC frequently cycles on and off without adequately cooling the air, this could indicate a problem with the compressor.
If you suspect issues with the compressor, it is advisable to seek professional assistance, as these problems are often complex and require precise diagnostics and repairs.
| Common Issue | Description | Solution |
| Incorrect Thermostat Settings | AC must be set to “cool” mode and lower than room temp. | Adjust thermostat settings correctly. |
| Dirty or Clogged Filters | Clogged filters reduce airflow and cooling efficiency. | Replace or clean the filters every 1-3 months. |
| Low Refrigerant Levels | Low refrigerant leads to poor cooling and specific signs. | Consult a professional for inspection and recharge. |
| Air Duct Issues | Obstructed or leaking ducts hinder airflow and efficiency. | Clear blockages and seal visible leaks; professional help for comprehensive sealing. |
| Problems with the Compressor | Compressor issues result in odd noises and poor cooling. | Contact an HVAC technician for diagnostics and repairs. |
DIY Troubleshooting Steps for AC not Cooling below 75 Degrees
01. Adjusting Thermostat Settings
Adjusting your thermostat settings is a simple DIY step to check before diving into more complex troubleshooting. Ensure your thermostat is set to “cool” mode and that the temperature setting is lower than the current room temperature. This ensures that your AC is primed for cooling.

02. Cleaning or Replacing Filters
Regular filter maintenance is crucial for optimal AC performance. It’s a relatively straightforward DIY task that can make a big difference in cooling efficiency. Here’s how you can handle it:
- Visual Inspection: First, locate your air filter. It is typically behind a cover or panel near the return air grille or air handler. Remove the filter cover.
- Check for Dirt and Clogs: Examine the filter. If it’s visibly dirty or clogged with dust and debris, it needs attention.
- Cleaning (Reusable Filters): If your filter is reusable (commonly made of foam or electrostatic material), you can clean it. Remove the filter and gently wash it with mild detergent and warm water. Rinse thoroughly, allow it to dry completely, and then reinsert it.
- Replacement (Disposable Filters): If your filter is disposable (usually made of paper or fiberglass), you will need to replace it. Make sure to get a replacement filter of the same size and type.
Regular cleaning or replacements of your filters every 1-3 months can help ensure proper airflow and cooling efficiency.
03. Checking for Refrigerant Leaks
If you suspect a refrigerant leak, it is crucial to address it promptly to avoid further damage to your AC system. Here’s how you can proceed:
- Safety First: Turn off your AC and unplug it for safety.
- Contact a Professional: Refrigerant handling is regulated and potentially hazardous. It requires specialized equipment and expertise. Contact a professional HVAC technician to inspect and repair any refrigerant leaks safely.
04. Inspecting Air Ducts
The condition of your air ducts can significantly affect cooling efficiency. While minor inspections and repairs can be DIY projects, a comprehensive assessment may be best handled by a professional. Here’s what you can do:
- Visual Inspection: Examine your ductwork for visible signs of obstructions or leaks.
- Clear Blockages: If you find obstructions, such as furniture or debris, that are impeding airflow, clear them to ensure proper circulation of cooled air.
- Seal Visible Leaks: If you spot visible leaks in your ducts, you can use duct tape to seal them temporarily. However, for a more comprehensive duct sealing job, it’s advisable to hire a professional ductwork specialist.
Professional HVAC Technicians: When to Call
While DIY troubleshooting can address many common AC issues, some problems are best left to professionals due to their complexity and the need for specialized equipment and expertise. Here are situations when you should consider calling a professional HVAC technician:
01. Complex Compressor Problems
The compressor is a vital component of your AC, and diagnosing and repairing compressor issues is a complex task. If you encounter signs of compressor problems, such as unusual noises or constant cycling, it’s best to leave these repairs to a professional technician who can accurately diagnose and address the issue.
02. Ductwork Repairs
While minor duct sealing can be accomplished as a DIY project, comprehensive ductwork repairs and modifications require the expertise of a professional. A professional ductwork specialist can ensure that your ducts are properly sealed, insulated, and free from obstructions to maximize cooling efficiency.
03. Refrigerant Recharge
If your AC requires a refrigerant recharge due to low levels, this task should only be performed by licensed HVAC technicians. Handling refrigerants is regulated by environmental laws and can be potentially dangerous if not done correctly. A professional technician can safely handle refrigerant and restore it to the appropriate levels in your AC system.
Preventive Maintenance for Optimal Cooling
01. Regular Filter Maintenance
Regularly cleaning or replacing your air filters is a simple yet effective way to enhance cooling efficiency. Here is a summary of the steps involved:
- Frequency: Aim to clean or replace your filters every 1-3 months, or as recommended by your AC manufacturer.
- Cleaning: If your filter is reusable, remove it, wash it with mild detergent and warm water, rinse thoroughly, and let it dry completely before reinserting.
- Replacement: If your filter is disposable, replace it with a new, compatible filter of the same size and type.
Proper filter maintenance ensures that your AC system has unrestricted airflow, allowing it to operate efficiently and cool your space effectively.
02. Cleaning the Condenser Unit
The outdoor condenser unit is responsible for expelling the heat collected from your indoor air. It needs adequate airflow to operate efficiently. To maintain your condenser unit:
- Clear Debris: Regularly inspect the area around your condenser unit and remove any debris, such as leaves, grass clippings, or dirt, that might obstruct airflow.
- Trim Vegetation: Ensure that nearby vegetation, such as shrubs or bushes, is trimmed to allow for proper airflow around the unit.
- Professional Cleaning: For a more thorough cleaning, consider scheduling a professional AC maintenance service. They can clean the condenser coils and inspect the unit for any signs of wear or damage.
A well-maintained condenser unit can effectively release heat, allowing your AC system to cool your home efficiently.
03. Professional Annual Servicing
While some maintenance tasks can be handled by homeowners, scheduling an annual professional HVAC maintenance service is highly recommended. Here’s what you can expect during an annual service:
- Comprehensive Inspection: A technician will thoroughly inspect your entire AC system, including the condenser unit, evaporator coils, electrical connections, and thermostat.
- Cleaning: They will clean components like the evaporator and condenser coils, removing dirt and debris that can hinder cooling efficiency.
- Refrigerant Check: The technician will check refrigerant levels and top off if necessary, ensuring your AC has the correct amount of refrigerant for optimal cooling.
- Duct Inspection: If needed, they’ll inspect your ductwork for leaks, obstructions, and proper insulation.
- Electrical Testing: Electrical connections and components will be tested to ensure safe and efficient operation.
- Safety Check: A safety check will be conducted to identify any potential hazards or issues that need attention.
Cost of fixing AC That Is not Cooling below 75 Degrees
The cost of fixing an air conditioner (AC) that isn’t cooling below 75 degrees Fahrenheit can vary widely depending on the underlying issue. Here’s a breakdown of potential costs for common AC problems:
| Issue | Cost Range | Description |
| Incorrect Thermostat Settings | DIY – No Cost | Adjusting thermostat settings correctly is a simple fix and doesn’t require spending money. |
| Dirty or Clogged Filters | DIY – Filter Cost | Cleaning or replacing filters costs the price of a new filter or cleaning supplies, typically $5 to $20. |
| Low Refrigerant Levels | $100 – $500 | Professional inspection and recharge can cost between $100 and $500, depending on the refrigerant type and quantity needed. |
| Air Duct Issues | $300 – $1,500 | Clearing blockages may not cost much, but comprehensive duct sealing by professionals ranges from $300 to $1,500 or more. |
| Problems with the Compressor | $500 – $2,500 or more | Repairing or replacing the compressor is a significant expense, ranging from $500 to $2,500 or more, depending on the extent of the issue. |
Remember that these are only rough estimates, and that costs might change depending on the location, the brand of the air conditioner, and the severity of the issue. Reduced long-term repair costs can be achieved by routine maintenance and rapid problem solving. For an appropriate price depending on your particular scenario, it is essential to get quotations from HVAC experts.
People May Ask: FAQs on AC not Cooling below 75 Degrees
Why is my AC not cooling my space below 75 degrees?
Several factors can contribute to this issue, including incorrect thermostat settings, dirty filters, low refrigerant levels, air duct problems, and compressor issues. Identifying the specific problem is the first step toward a solution.
How can I check if my thermostat settings are correct?
Ensure that your thermostat is set to “cool” mode and that the temperature setting is lower than the current room temperature. This ensures that your AC is engaged in the cooling process.
What are the signs of low refrigerant levels in my AC?
Signs of low refrigerant include reduced cooling performance, ice buildup on the evaporator coils, hissing or bubbling noises from the refrigerant lines, and higher energy bills. If you suspect low refrigerant, consult a professional technician for inspection and recharge.
Can I perform DIY troubleshooting for AC issues?
Yes, you can attempt DIY troubleshooting steps like adjusting thermostat settings, cleaning or replacing air filters, and checking for visible ductwork issues. However, for complex problems, professional assistance is recommended.
How can I maintain my AC for optimal performance?
To maintain your AC’s efficiency, regularly clean or replace air filters, clear debris around the condenser unit, and schedule annual professional servicing to ensure all components are in good working condition.
Conclusion
In summary, when your air conditioner struggles to cool your space below 75 degrees Fahrenheit, a methodical approach is essential. First, check for common issues like thermostat settings, dirty filters, low refrigerant levels, air duct problems, and compressor issues. DIY troubleshooting may often resolve these problems. However, for more complex issues, it’s wise to seek professional assistance from HVAC technicians with the expertise to diagnose and address them effectively.
Regular preventive maintenance is vital for optimal AC performance, ensuring a cool and comfortable indoor environment during hot summer days. Following the steps outlined in this guide can help you achieve consistent and efficient cooling in your home.

